
Unifi and PiHole for Home Networking
Updated October 2023 to reflect that Unifi controller now requires 64 bit OS.
These instructions detail how to set up a headless Pi with the Unifi controller to manage a small network of Unifi network equipment and provide ad/content filtering via Pi-Hole.
Unifi (Ubiquiti) makes some great networking equipment for small to medium sized businesses, providing WiFi access points, switches and network gateways. The units are designed to work together and allow you to build a system that suits your needs reasonably inexpensively. They are well supported (including an active user forum) and can be configured/managed from a single intuitive web based console that runs in the cloud or on a local controller device in your network. They make a device that acts as a local controller, but they also provide the management software so you can install on your own device, eg a Raspberry Pi.
PiHole allows you to filter ads and other content by providing a local DNS service on your network. This can be useful not only for ad filtering but to limit or monitor access to specific domains from clients on your network. PiHole works by fetching domain lists maintained by external spam monitoring providers and comparing domain lookup requests from clients on the network with the lists, effectively dropping requests that match an entry in the lists with the effect that ads and ad scripts do not appear in the clients web browser. You can add additional domains that you want to block using the “blacklist” functionality in PiHole and conversely unblock domains or specific subdomains using. the “whitelist”. PiHole also maintains logs so you can see what domains are being requested/accessed by clients on your network.
Prepare the Raspberry Pi
The most stable setup will require your RPi be connected via ethernet cable. You will need:
- Raspberry Pi 3B or later
- Ethernet cable
- 16G micro SD card (or larger to allow plenty of space for logs)
- Power and ethernet cords for the RPi
Next:
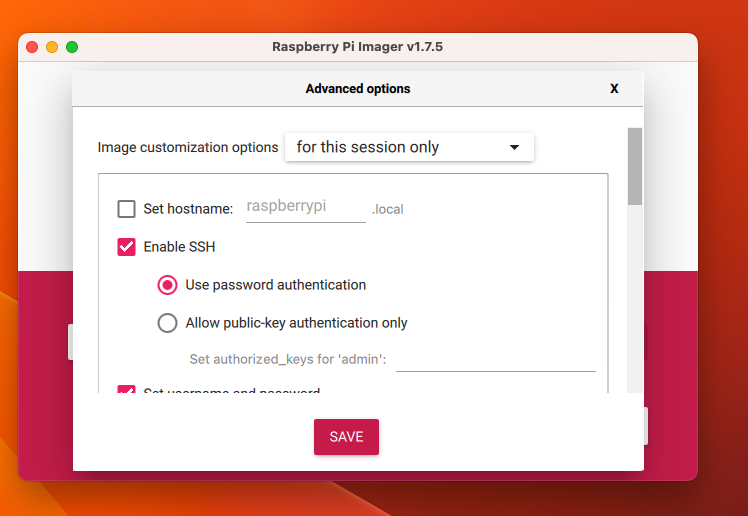
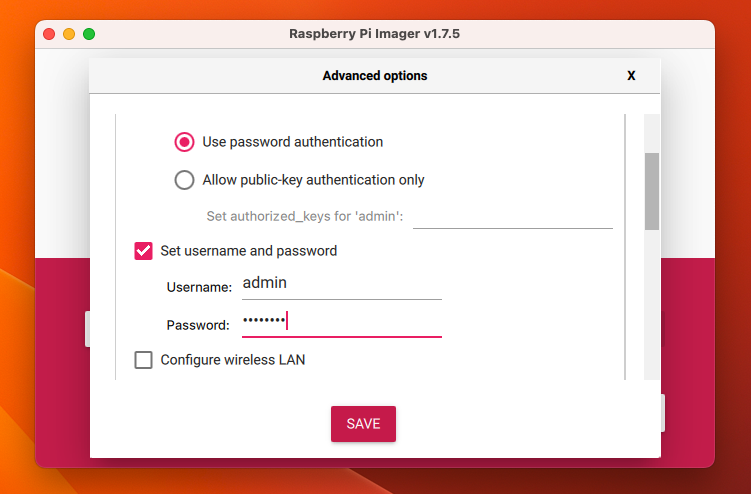
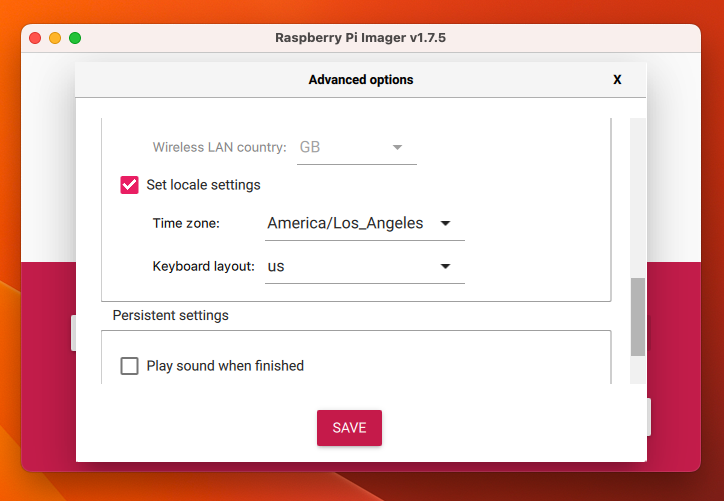
- If you haven’t already done so, install the Raspberry Pi imaging tool.
Select OS 64bit Lite image in the Raspberry Pi imaging tool, enable ssh support, provide a login username and password, set a hostname and set locale before proceeding to flash the SD card:
- Connect the RPi with the ethernet cable
- Insert the SD card into the RPi and power it up
- Connect to the RPi using SSH from your desktop computer (eg PUTTY on Windows, Terminal on the Mac) using the username, password and hostname you set in the Raspberry Pi imaging tool, eg:
ssh someusername@somehostname
If you did not set a hostname in the imager, “raspberrypi” is the default hostname for a new install of Raspberry Pi OS. If your computer does not find the RPi on the network, you will need to use a network scanner to find its IP address and then connect using that instead, eg:ssh someusername@123.123.123.123 - You can change the hostname using the command:
sudo raspi-config
which brings up the Raspbian configuration tool: select “System Options” followed by “Hostname” and enter your preferred hostname and save it. You will need to reboot the RPi for the change to take effect. - Make sure all packages are up to date:
sudo apt updatesudo apt upgrade
or (all one line):sudo apt-get update && sudo apt-get upgrade -y && sudo apt-get autoremove -y && sudo apt-get autoclean -y
Install Unifi Controller
- Install MongoDB runtime on the Pi by following these instructions (no need to set it up as a service).
- When the Unifi controller starts up it requires a good entropy source for random number generation. On desktop computers this might typically be from mouse movement, but the RPi will be a headless install so we install a package to help:
sudo apt install rng-tools5 - Add the Unifi controller software repository to our package source list to simplify install and updates (all one line):
echo 'deb https://www.ui.com/downloads/unifi/debian stable ubiquiti' | sudo tee /etc/apt/sources.list.d/100-ubnt-unifi.list - Add the Unifi repository key (so the package manage can verify authenticity of the Unifi packages):
sudo wget -O /etc/apt/trusted.gpg.d/unifi-repo.gpg https://dl.ui.com/unifi/unifi-repo.gpg - Because we added a repository source we should run the package manager updater:
sudo apt update - Now install the Unifi controller which should also configure it to start automatically as a service:
sudo apt install unifi - Reboot the RPi:
sudo reboot
and then log into it from your desktop to complete configuration of the Unifi controller:https://<hostname or IP address assigned to the RPi>:8443
Important: configure the RPi to have a static IP address so that it can function reliably as a DNS server. This will require you to configure your network’s DHCP provider (typically your router) to always assign the same IP address to the RPI’s MAC address. You can find the RPI’s MAC address by connecting to the RPi using SSH and then entering the command:ifconfig
The “ether” entry for eth0 is the MAC address on the RPi’s ethernet port.
Install PiHole
Follow the directions on the PiHole GitHub page to install PiHole. After installing you should be able to connect to it from your web browser using:https://<hostname or IP address assigned to the RPi>/admin
When setting up PiHole, remember to configure it to use upstream DNS otherwise you will not be able to connect to web hosts outside of your network. Your upstream DNS provider could be one of the following:
- Those provided by your ISP
- OpenDNS which includes DNS servers to filter out adult content
- Google Public DNS which are generally fast and reliable but are run by Google, so presumably harvest usage data…
Important: your network clients will not use PiHole unless they are told to use it as their DNS source. Typically the DHCP provider on your network (typically your router) provides the DNS server address to network clients – if you have a Unifi router then you can use the Unifi controller you just installed to configure the DNS settings to use the RPi’s IP address as the DNS provider, otherwise configure your router accordingly.
Updating Unifi Controller and PiHole
You will get update notifications for PiHole as links that will appear within the PiHole web UI when new PiHole versions are released. You can update by ssh-ing into the RPi as before and issue the following command:pihole -up
The Unifi Controller web UI will notify you when a new version has been released and typically provide a download link – do not click the link. Instead ssh into the RPi as before and issue the following commands:sudo apt update; sudo apt upgrade -y
which will also update any other software on the RPi.
Important: clients on the network can bypass PiHole by entering DNS server addresses directly in their network settings which will allow then to do DNS lookups from external DNS servers. To prevent this you will need to add rules to your router to prevent DNS lookups from any client except the RPi running PiHole.